


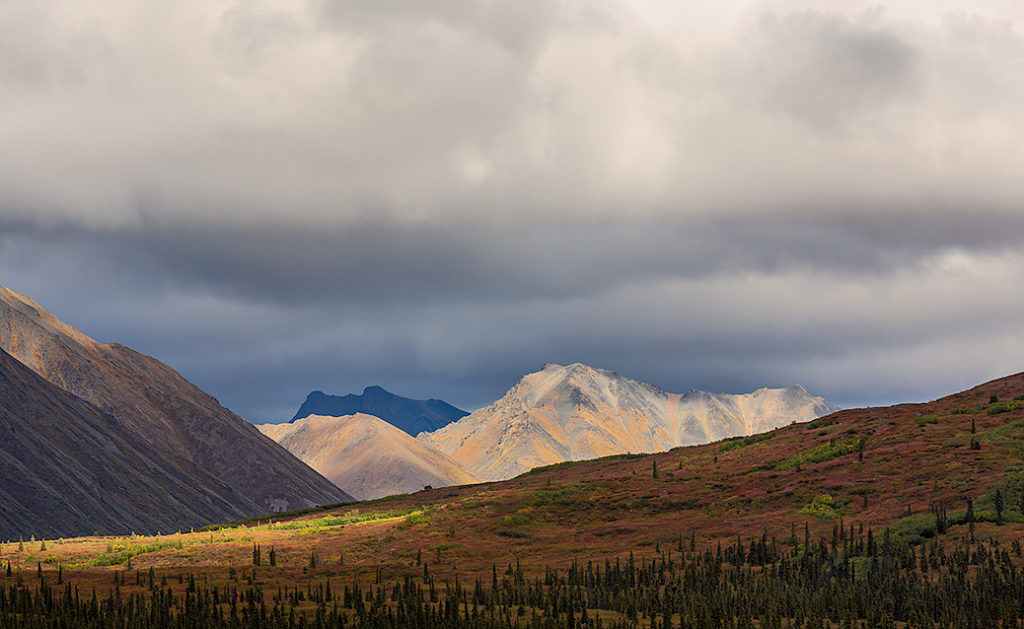
Photographers are connoisseurs of light, and the right light grabs our attention like a porch light bulb at night attracts moths in the summertime. In Alaska we are blessed with epic landscapes. Most photographers would be hard pressed not to find a good landscape composition to photograph, but the right light to suit our mood or the subject is not always available. Some photographers chase the light. Others, myself included, sometimes feel chased by the light (nod to Jim Brandenburg, Chased by the Light). Oh, but when the right light presents itself the experience can be photographic bliss. Landscapes in sweet light are luminous; they seem to glow or emanate a certain something beyond just photons. This photo of the Clearwater Mountains as sunlight from the momentary parting of clouds spotlighted the autumn tundra and peaks is a good example.
As good as digital cameras are today, they need some post-processing help to bring out the nuances of light and shadow that our eyes see. RAW processing software like Lightroom is a good place to start, but when it comes to making local adjustments Photoshop excels with layer masks. Think of a layer mask as a stencil placed over the image that allows for selective adjustments to be made to specific portions. These “stencils” are called selections in Photoshop. Selections range in complexity from simple (manually drawn) to complex (automated). For example, the rectangular marque and lasso tools create selections based on what you draw on your photo. It can be time consuming and depends on how well your fine motor skills are for drawing. Automated tools, like the magic wand and quick selection, select image pixels based on the similarity of neighboring pixels based on a tolerance you set. The automated tools can dramatically speed up the selection process but sometimes have a mind of their own.

Regardless of whether a selection is made manually or automatically, they all share one shortcoming — the resulting mask oftentimes has a hard boundary between the targeted adjustment and the rest of the photo. Additionally, the adjustment is a consistent strength across the selection, usually all or nothing, but can be in between with a gray mask or use of the opacity slider. As an example, I want to make the spruce trees in Figure 1 lighter to bring out more of the warm light from the evening sun. Using the lasso tool, I selected the trees and created a mask, Figure 2. Everything that is not black in the mask will be adjusted, when for example, I use a Levels adjustment to lighten the trees. This mask is quite crude, but with more time I could manually mask around each of the tree branches to create a tight mask. Or I could try to use the Color Range tool to select the trees based on color. Furthermore, I could “feather” the edge of the selection so when I made an adjustment it would transition softly to the unaffected areas. Nevertheless, any adjustment I make to the spruce trees would be done equally, even though some parts of the trees are lighter than others. As a result, the details in the trees would lose contrast and appear flat. Here is where luminosity masks solve the problem.

Luminosity is defined as the relative brightness of an object. For simplicity, pixels are assigned a value between 0 and 255, with 0 representing completely black and 255 representing completely white. Luminosity masks allow selections to be made based on the brightness of a pixel. In the Photoshop world of masking, luminosity masks reign supreme. This is not a tutorial on how to make luminosity masks. You won’t find a menu item in Photoshop to create luminosity masks. Suffice to say there are a few ways to manually generate luminosity masks in Photoshop that start with a “lights” mask. By inverting the “lights” mask a “darks” mask can be created. And through a number of intersections and subtractions of the masks, various shades of lights and darks masks, as well as midtones masks can be made. A number of photographers offer software plugins to Photoshop with panels (or free actions) to create luminosity masks such as Lumenzia, Raya Pro, TK Actions, and f64 Academy. In Figure 3 eighteen luminosity channels — six lights, six darks, and six midtones — were created with a free downloadable action.

The Darks 5 channel was chosen as the best option to represent the spruce trees. The Darks 5 channel, Figure 4, looks like a negative for a black and white image. Herein lies the superiority of luminosity masks: the various shades of grey moderates how much of an adjustment shows though based on the pixel luminosity. It is equivalent to zooming in to the pixel level and changing the opacity of an adjustment based on its luminosity! To create a mask from this channel the Load Channel As Selection icon at the bottom of the channels palette is pressed. Figure 5 shows the “marching ants” that delineate the selection based on the luminosity of spruce trees. While it may not look comprehensive at the zoomed out view, it is quite detailed at 100% (i.e., the pixel level). Furthermore, the pixels in the selection include the reflection of the trees in the pond! It seems obvious that if we are going to lighten the trees that their reflection in the water needs to be lightened. Imagine the difficulty trying to create this selection with the other selection tools.

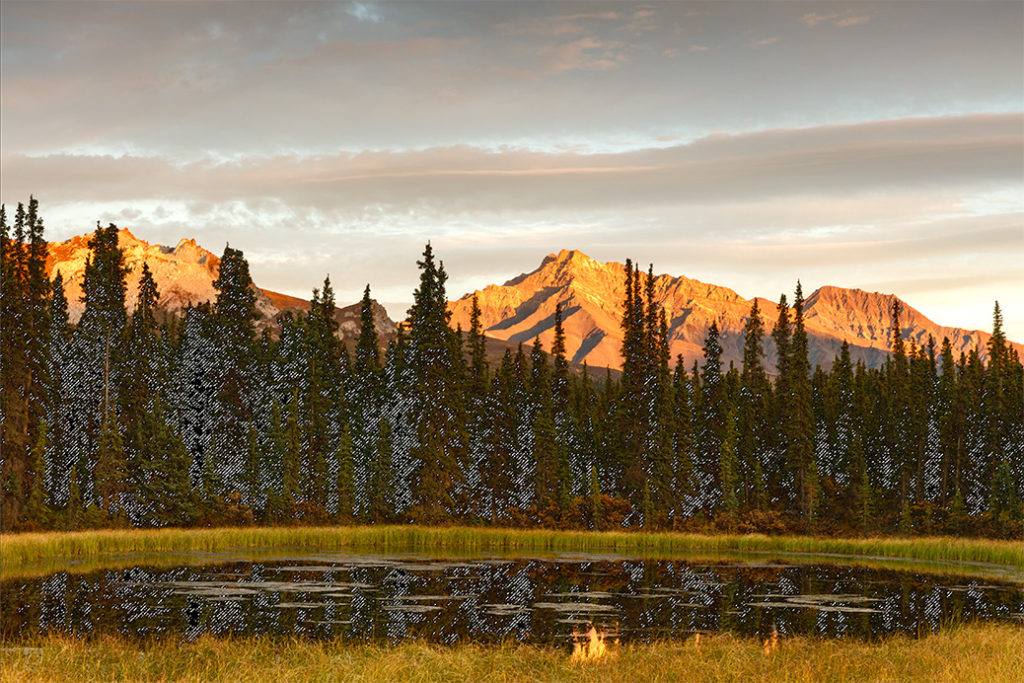
With the selection active, a Curves adjustment layer was added which automatically creates a layer mask from the selection, Figure 6. Therefore, any subsequent curves adjustment only affected the masked areas. I raised the RGB curve to lighten the spruce trees. The before and after images are shown in Figure 7. The shadows were subtly opened up while preserving the local contrast among the tree limbs. Another benefit of luminosity masks is that they are self-feathering. That is, no feathering of the mask is needed since the transitions are based on individual pixel light values. The result is a seamless adjustment that is natural looking as opposed to one created manually with hard, arbitrarily defined boundaries. Lastly, the adjustment includes the tree reflections which share the same luminosity as the trees.

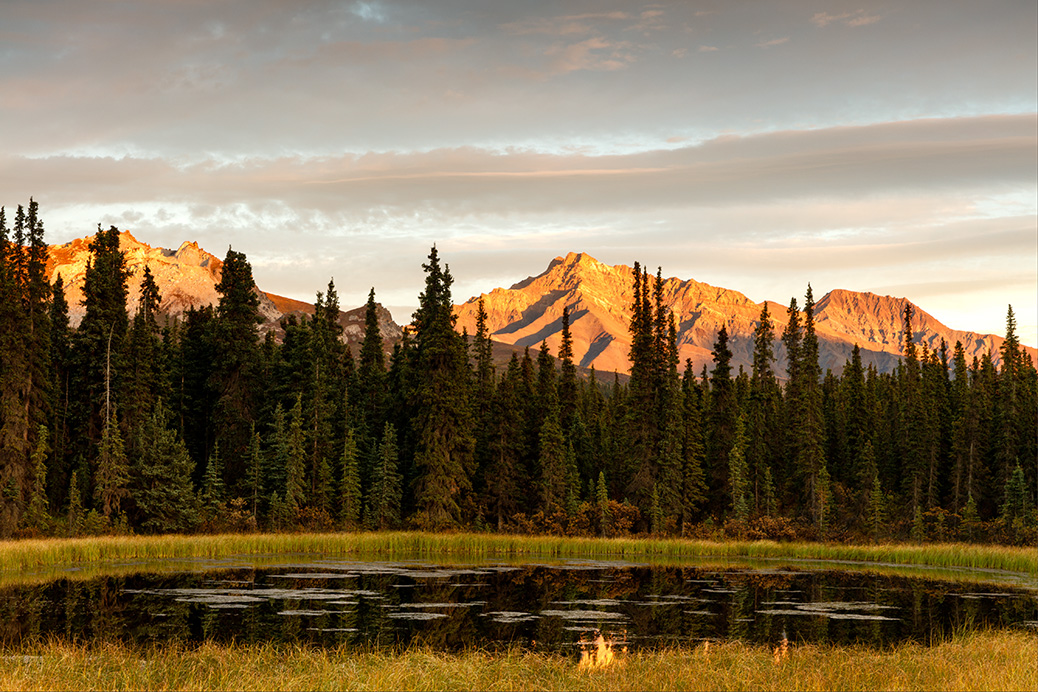

Figure 7 – before and after Curves adjustment
Luminosity masking is a leading edge post-processing technique to make specific, localized adjustments to bring out the various luminous qualities of light in digital imagery. As daunting as that may sound, once a set of actions for creating the masks is made (or acquired) the rest is easy to implement. Luminosity masks can even be modified by applying a Levels or Curves adjustment to the mask itself! Blend If can be used to refine the mask one step further by restricting the range of allowable pixels used in the selection. Some have taken the technique to the extreme, like photographer Jimmy McIntyre at Shutter Evolve, who developed the Raya Pro plug-in to exposure blend two to three different exposures using luminosity masks. I have to admit this alternative to High Dynamic Range processing is difficult to learn, but it has been shown to produce very realistic looking HDR composites. I hope this quick introduction to luminosity masking encourages you to explore this technique. It has the potential to take your post-processing to a higher level the next time you are graced with that special light.
Wow this is super cool!! I came to see the pic but love all the info shared too. Thank you!
You are welcome!